Forking Up Git
19 Feb 2018A Brief Introduction
Version control systems (VCS) have a long history in software development. Superceding the previous major VCS, SVN, Git was created by Linus Torvalds in 2005 and has since exploded in popularity for its power and flexibility. One of the big drivers of this popularity is Github, an online hosting service for projects using Git as a VCS.
Things You’ll Need
- A terminal. GUI Git clients almost always cause more problems than they solve.
- Git installed locally.
Forking Up Your Code
Git is an essential tool for the modern developer, but in my experience, a lot of people struggle with the various ways it can be used. There are a number of workflows with Git, however one I’ve favored - especially with larger teams - is the fork and pull model. In this workflow, you have the main repo (the source), which is the one source of truth for the code and what gets deployed to production. You then fork the repo so you have a personal copy of it to work on. A key to this model is that you keep the master branch of your fork in sync with that of the source repository. Now you will clone down both the source repo and your fork: git clone <address to source repo>, navigate to the directory, and now add your fork as a remote: git remote add <remote name> <fork address>. Once this is done, you can verify that the remotes were set up correctly with git remote -v and you will see something like this:
origin  git@github.com:source/source-repo.git (fetch)
origin  git@github.com:source/source-repo.git (push)
forkremote git@github.com:<youraccount>/fork-repo.git (fetch)
forkremote git@github.com:<youraccount>/fork-repo.git (push)
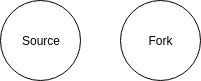
The code bases will now look something like this:
Branching Out
Now, when you want to make some changes, you will work on what is called a feature branch. This will allow you to have a source of truth (the master branch) locally, as well as a ‘separate’ codebase on which to do your work. This branch should only encapsulate the smallest unit of work that makes sense on your project, as well as any testing necessary.
Before making your new branch, ensure that your local master branch is up to date with the origin remote’s master branch. To do this, verify that you’re on your local master branch: git branch -a will show all local and remote branches with an asterisk next to the currently checked out branch:
* master
  remotes/origin/HEAD -> origin/master
  remotes/origin/master
To get back on master, check it out: git checkout master. Now you will want to pull down any changes, if your local repo is set to track the origin remote, git pull will suffice. Otherwise, explicitly pull by providing the remote and branch name: git pull origin master.
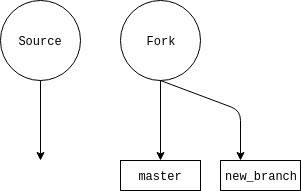
Now that you’re synced, you can create your branch with git checkout -b new_branch_name. You are now working on your new branch. All code will be confined here, and you can easily switch back to master or any other branches with git checkout branch_name, as long as any changes are committed.
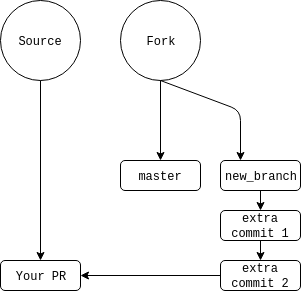
Here’s a diagram of what your repos should look like:
Steps only
- Sync to the
originremote a.git checkout masterb.git pull/git pull origin master git checkout -b new_branch_name- Work
Making your PR
When you have tested and are satisfied with your work, you will be ready to submit this code to a repo’s maintainers - this will be made to the origin repo. First, though, we need to make sure our work is saved. You want to add the files, and there are a few ways to do this. git add . OR git add -A will update all file modifications in a directory and its subdirectories so that your git indexes will match the state of the directory (this is for git 2.x only, behavior is slightly different in git 1.x - see discussion here). You can also add individual files with git add filename.py or groups of files with fileglobs: git add *.py.
You will then need to commit these changes along with a descriptive commit message: git commit -m "your message here". You can add multiple commits to a PR if that makes sense given the culture of the project or team you’re working on.
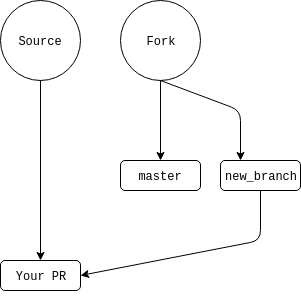
After that, assuming you don’t need to rebase (more on that below), you will push to your own fork repo: git push fork new_branch_name. You can then go to the original repo in Github and you will be greeted with a small dialog inviting you to make a pull request. Click the button, and give your PR a descriptive but short title and a more verbose description. Now make the PR and get reviews.
If your PR gets added, it will look like this, with your commits in your PR a part of the main codebase’s history.
Change is Hard
Often, reviewers will request changes. It is totally okay to add more commits to reflect these changes - I usually like to do one commit per request or atomic change. Simply make sure you are still on your feature branch locally, make your changes, add with your favorite add mechanism (e.g. git add .), then commit the changes with git commit -m "message here" - this will give you a single commit. You can either push right away (pushes to your repo will be reflected in the PR), or add multiple commits and then push them with git push fork feature_branch - the procedure stays the same.
Let’s add a few commits to our diagram:
All Your Rebase Are Belong To Us
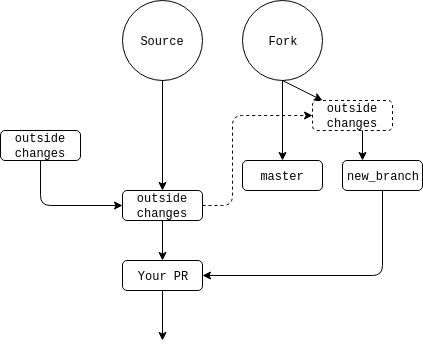
Outside Changes
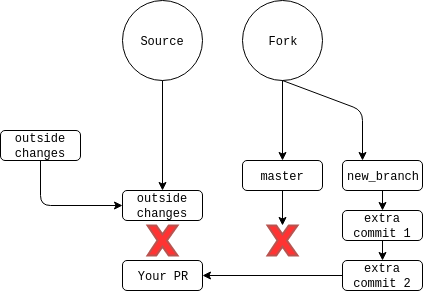
What happens if, in the course of your changes, the maintainers of the repository merge in other change, desyncing your master (and therefore feature) branches? The repos now look like this:
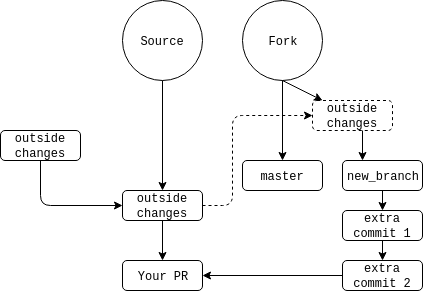
You will want to pull the changes and make that the new base on which you build your changes - this is called rebasing. When done, the new outside changes will be on the bottom of the stack of commits, with yours following. There is a single command that does this for you - git pull --rebase origin/master if wanting to PR to the origin remote and master branch. Some people advocate a simple git pull but that will pollute your PR and, eventually, the main repo history with extraneous merge commits. If it works, since you’ve changed the commit history: git push --force fork feature_branch.
Many times, though, you will see conflicts. These are areas in which both the original changes and your own affect the same parts of a file. When this happens, a three-way merge editor will launch. A what?
A Short Detour…
A three-way merge editor is an editor that will show you 3 versions of the code - your local branch, the code on the remote, and the code that you’ll eventually push. You can decide which lines will be included and which won’t. There are a lot of great tools to use, for Linux I’m partial to Meld. Other valid tools can be found by running git mergetool --tool-help. Once you have installed one, configure git to use it with git mergetool --tool=<tool>.
Back to Rebasing, Back to Reality
I slightly lied before. Your merge tool won’t automatically launch, git will report a conflict, and you will have to run git mergetool, which will launch your tool. Once you’ve made your changes to where all 3 files are equal, save and close your editor. Then you will run git rebase --continue. You may have further conflicts (especially if you have more than one commit on the feature branch), or you may not. If you do, repeat the steps above. Once there are no longer conflicts, push back to your feature branch with git push --force fork feature_branch.
Now the history will look something like this:
And your PR will now be good to go. Hopefully.
Rebasing to a Single Commit
If you have multiple commits, the maintainers may want you to rebase to a single commit, or fewer commits than you currently have. This is a little bit easier than merging in conflicts. Say you have 3 commits, as shown in our diagrams up to now. The final two commits should technically be part of your first commit in this scenario, so the maintainers asked you to rebase to a single commit. To do this, we will do an interactive rebase with the following command: git rebase -i HEAD~3 - this means we will interactively rebase from HEAD (which is a pointer to a commit, in this case the initial commit of the branch - read more here) to the 3rd commit. When you do this, an editor (often Vim or nanom but you can set this to another if you wish) will come up with the commit names and hashes:
pick e13b717 new_branch_commit
pick 2f7bf3f new commit 1
pick 8105378 new commit 2

# Rebase cb6f2cc..8105378 onto cb6f2cc (3 command(s))
I cut off some comments, but they expand on some of the commands we can use. These are pretty self-explanatory, so I won’t go into any but fixup, which is what we will be using. You will replace the bottom two picks with fixup or just f:
pick e13b717 new_branch_commit
f 2f7bf3f new commit 1
f 8105378 new commit 2

# Rebase cb6f2cc..8105378 onto cb6f2cc (3 command(s))
What pick does is tell git that we will be keeping that commit. fixup is a command that will fold the commit into the previous one and remove the commit’s log message. When done, you will save the file and close the editor, then push the code: git push --force fork feature_branch. Now our diagram looks like this: